


From the manufacturer

|
|
|
|
|
|---|---|---|---|
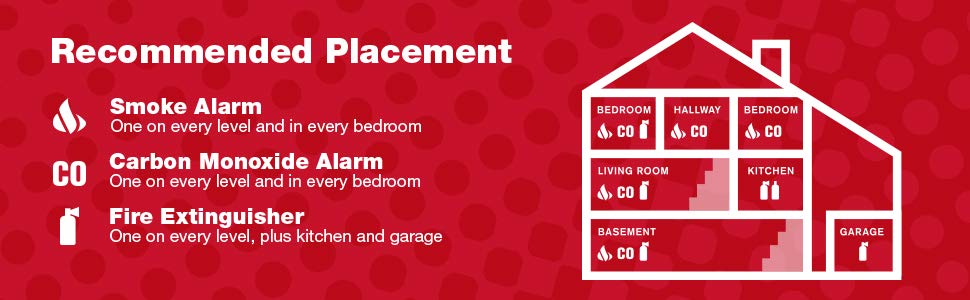
Smoke AlarmsPlace at least 10 feet from kitchen/stove, and on the ceiling or high on a wall, no more than 10 inches from top. |
Carbon Monoxide AlarmsCarbon monoxide alarms can be placed anywhere, not just the ceiling or high on a wall. They should be replaced every 5 to 7 years. |
Fire ExtinguishersKeep in the kitchen and garage, but make sure to have the right grade for the type of fire that might occur. |
Escape LaddersHave at least one if your home has more than one story. Each room needs 2 escape routes; in most bedrooms it’s the window, so have a ladder nearby. |


Max –
After some research about current fire safety recommendations I realized I had to upgrade from a single smoke alarm by my stairwell. I incorporate smart home tech into a lot of my place but didn’t think the benefits of smart alarms warranted that investment. These handy alarms from one of the top brands caught my eye because they could be programmed to know their location and announce the alarm throughout my house. It’s smartish, in that you can be told which alarm is ringing and never worry about missing an alarm, from say the basement, because the siren is repeated on all units. This feature was the key for me as our family grew – safety for each family member regardless of location. I won’t call it programming but the setup of each unit along with the linking wasn’t hard but definitely a bit tedious. I have 4 of these linked now and plan to add 2 more soon to replace some legacy ones I have in more central parts of the home where I originally wasn’t worried about the siren being heard. Be sure to pair these with a few extinguishers, a general plan for your family, and a plan to check the batteries regularly and you’re starting to make your home a safer place. Great buy!!!!!
DLH –
Over all, not bad for saving the effort of running 14-3 wiring. In our area the code requires synced smoke alarms, wired or wireless. These smokes take a minute to figure out given they are a little finicky and only have one button for all functions including testing, syncing, and setting location. The voice recording is nails on a chalkboard, but I suppose that isn’t a problem in a fire. Over all pleased, especially for the price.
david l west –
Wireless Interconnect Pairing InstructionsWhat are the steps to pair wireless interconnecting detectors to each other?Step 1: Pick a unit to be the “Teacher”• On that unit, simply open and close the battery drawer (if batteries are not installed, insert them at this time.)o This is all you do with this unit right now.Step 2: Prep the “Students”• On the units you want to connect (all the other detectors, minus the “Teacher”), while the drawer is open, press and hold test button and close drawer at the same time.o The light on the detector should be now blinking green.Step 3: Press and hold down the test button on the “Teacher”• You should then hear the other units (“Students”) chirp or start talking. This will indicate they are paired.Step 4: Press and hold the test button on any unit to test them.• If you paired them successfully, they should all start to test.o Make sure you hold the test button down until each chirp or say “Testing” (voice units only).To set location:SCO500, SA511, and CO511 units all have a voice feature. In order to change/set location, follow these steps:1. Open and close the battery drawer on the unit you want to set the location on.2. The unit will begin to talk and mention “To change location, press and hold test button now.”• At that moment, press down on the test button for about a second and let go. You should then hear the different location options. If you don’t, start from the beginning and try again.3. When you come to the location you would like to set, press and hold the test button down on that location.• If you miss the location you want, don’t worry. The options will continue to cycle through and back to the beginning.4. Once the new location has been set, the detector will notify you by saying “(Insert Location) location has been programmed.”Note:If you ever need to unpair your alarms, follow these steps to do so.1. Insert the batteries into the drawer of the alarm to be unlinked. DO NOT CLOSE THE DRAWER.2. Press and hold the test button while closing the battery drawer.3. Once you hear the unit chirp, release the test button. The green power LED will start to blink indicating the Wireless Alarm is waiting for program data.4. Press and hold the test button on the same alarm to unlink until the alarm chirps and its green power LED stops blinking. Then release the test button.5. This alarm is now unlinked.
kt –
It seems some people got a DVD to explain how to link the devices. I did not. I called customer service and they told me some helpful info that was not included in the instructions that I got from the package. Her language was that you need to designate a “teacher” device and “student” devices. If you have 3 or more, you have one teacher and the rest are students. First, you have to set up (program) the names for each of the devices (basement, kitchen, etc). This is pretty easy since the device will talk you through this. After this, take your “teacher” and set it aside. Open the drawers of all the students. Take your teacher and open and close the drawer (but don’t hold down the test button while you do this). Now, take each student (one at a time) and hold down the test button and close the drawer. Once you hear a chirp you take your finger off the test button. Then go to the next student, put your finger on the test button and close the drawer. Once it chirps let go of the button. Do this for all of the students. BTW, you will have to do this with all of the students within 2 minutes for them to all connect. After you are done, hold down the test button on any of the devices and they should all sound the alarm together. Hope it helps.
bob juno –
Hoping the never go off
yesitstony –
I bought these on 12/2020 to complement the battery operated wirelessly interconnected detectors from first alert I already had. They worked fine for 10 months. Then one started causing false alarms, so I blew compressed air through it. I noticed the “smoke LED” was blinking slowly, both before and after the air treatment. Within a week it false alarmed again. I pulled it out of service. Now a second unit is doing the same. This time I gently pulled it apart and blew compressed air through it, put it back together again, and replaced the batteries. The “smoke LED” is still slowly flashing red. I looked online for reasons this might be happening, but to no avail. The manufacturer sticker indicates they were made in November 2020, so they aren’t old at all. I don’t recommend these units, as it wasn’t just one, but two that failed. I have four others that are operating currently, but for who knows how long.
Puzzling –
Our old detectors were way past their prime and due for replacement. Apart from wanting to switch from the ionization type (prone to false alarms from cooking), we also wanted to have them interconnected so an alert at the far reaches of the house would activate all detectors. The voice features along with the naming of locations was a bonus but one that actually makes it fun to test these. I would dread testing the prior ones because it meant testing them individually, but now we push the button on one and you hear a fun cascade of the test message along with the announcement of the location of the test. We get everyone involved to make sure they heard the message clearly on their detector.Programming the location of each detector and linking them into the existing set of detectors is a little confusing. I think the instructions could be improved. It’s not clear how long you need to “hold” the button. It’s actually only for less than a second but that’s not what I think of when I hear “hold”. Also it’s really loud when you program the location so it would be nice if the voice during programming wasn’t as loud. Fortunately you only do that once so it’s a minor inconvenience. Consider earplugs if this bothers you. Finally there is a finite list of rooms. So we have two detectors set to “Hallway” and four set to “Child’s Bedroom”. It would be nice if you could add an optional number to the end so each was unique. But we can live with this.Summary:Installation is easy, the programming is slightly confusing but doable, features are great, sound is loud which is good (except when programming), interconnecting without wires is awesome and testing is fun!
Soifer –
These detectors are great!I originally purchased some of these wireless interconnected detectors for one of our vacation rental properties because the licensing authority required interconnected detectors in each bedroom (these are usually hard-wired), as well as in all the main areas of the house. They worked so well that I have since installed them in each of our homes as well as in my parents and my grown children’s homes.Pros (+) and Cons (-):(+) – They very easy to install (I recommend self-tapping drywall screws and forget about drilling and the plastic toggles and screws that come with each unit – hold the base on the ceiling, insert 2 drywall screws, snap the unit onto the base and you’re done – 2 minutes at most).(+) – They are really easy to program. I do it a little differently from the instructions – when I put the batteries in the unit before I put it up I push the test button when the unit initializes and then select the room location. Then when I snap the unit onto the base I open and close the battery drawer while holding the test button, the green light flashes and I go to the next nearest detector and push its test button and voila, the new detector is now on the wireless network and goes into its test mode in the room where I installed it. Very quick and easy!(+) – They are really loud, and when one goes off they all do, each one reporting the location of the originating alarm (“Fire in Child’s Bedroom” for example, or “CO2 level in Kitchen is xxx parts per million – Evacuate!” when you have a combo smoke and CO2 detector).(-) – It would be nice if they provided a location recording function so you could program additional locations with your own voice because the detectors come with a finite set of locations that you can use. For example, there is no “garage” location to choose from, or “upstairs” and “downstairs” locations that might be duplicates (like hallways, bedrooms, etc.). There’s only one “Child’s” or “Guest” bedroom locations to choose from so it would be nice to be able to program each child’s room with their name, so you could say: “Nancy’s Room” or “Teddy’s Room”. As it is now, if you have 3 kids’ bedrooms, each one would say “Fire in Child’s Bedroom” and you would not know which child’s or if it was upstairs or downstairs. Nonetheless, this is 100% better than just having one detector in each hallway and not knowing where the fire was concentrated at all.Bottom line… I recommend that you get one of these for every room in your house. It will be expensive, but shy of getting a complete central alarm system, it will be the best piece of mind that your dollar can buy for you and your family’s home safety.
Steve S –
I bought a few kits for our casita we built. Costco occasionally sells these for cheaper so look there before buying here. At the time In urchased these Costco wasn’t selling them. Set up is easy and they talk to each other on testing.
iLLuMNaTi –
First Alert SA511CN2-3ST Interconnected Wireless Smoke Alarm with Voice Location, Battery Operated, Pack of TwoWe paid $70 per pair from Amazon on Jan 4, 2018. We bought 3 sets for a total of 6 detectors. They arrived on Jan 7 and I just finished installing them tonight. So far, I am very impressed with these smoke detectors. I wanted to provide a review to share my experience with you.Before deciding on these, I read some smoke detector reviews for several different brands and models and choose these for the wireless communication features and the price. I also watched some YouTube videos and Amazon reviews on this particular alarm system.Let me start with a list of PROs and Cons.PROs:1] Easy to program and install (once you read the instructions carefully).2] Intelligent design … smart latching mechanism and mesh Wi-Fi network technology.3] Nice and loud, good if you are a deep sleeper or have TV or music turned up loud.4] If one of the detectors alarms, they all alarm and tell you where the potential threat is.5] Affordable price at $35 a pop.6] Battery enclosure is accessible without having to un-mount the detector from its base.CONs:1] The wall anchors are too small for my taste, so I used the kind I like instead.2] The range is only about 50 feet from one to the next.3] Maybe too loud for some people, when they all go off in your house at once, it sounds intense.4] It will not connect to your home Wi-Fi or network; therefore you cannot get a notification to your phone, tablet, laptop, etc. via an app.Here are some tips to help you program and link them.Programming and linking are two separate procedures. All programming does is assign a built in name for each specific unit. Linking them allows them to communicate with each other. You don’t have to program them or link them, in which case they would just act like a $10 standalone smoke detector.What I did is put batteries in all 6 detectors and assigned a different name to each one. To do this,1] Open the battery compartment put in the two AA batteries, paying attention to polarity.2] Close the compartment door and you should hear a brief chirp followed by this message:”Welcome. First Alert smoke alarm, no location programed. To change location press and hold test button now. Press and hold test button to test the unit.”3] After the message says “…test button now.” and before the message is over, press the test button for two seconds. If you miss this, start over by opening the battery compartment, wait a few seconds, then close the battery compartment and try again.4] Once you get that right, the unit will continuously cycle through all the names you can choose from.Basement -> Childs Bedroom -> Dining Room -> Family Room -> Guest Bedroom -> Hallway -> Kitchen ->Living Room -> Master Bedroom -> Office -> Utility Room -> No Location -> (Then back to Basement – repeat)5] When you hear the location you want to assign the unit, push and hold the test button for one second just after the location you want to choose is announced and just before the next location is announced.6] Mark each unit with a tiny post it note, sticker, piece of tape with writing for the name you assigned.Now you are done programming that unit and the assignment will remain even if you replace the batteries. Linking them is easier, especially if you have them all in front of you on a table, bed, couch, or floor.1] Open all the battery compartments except one which I will call unit 1.2] Press and hold the test button on unit 2 first, and then close the battery compartment for unit 2.3] When you hear unit 2 chirp, release the button on unit 2.4] The power indicator on unit 2 will have a fast flashing green light indicating communication.5] Put unit 2 face down on a cushion or pillow (so it won’t be so loud) and pick up unit 1.6] Press and hold the test button on unit 1.7] When unit 2 chirps, you can let go of the test button on unit 1.Note: If you wait more than two minutes between steps 5 and 6, you may need to start over at step 1.Unit 2 is now linked. Repeat these steps for the unit 3, unit 4, and so on. It does not matter in what order you link them because they use a mesh network to communicate. They should remain linked even if you replace the batteries.If my instructions fail, try using the procedure in the manual.What appeals to me about this alarm system is that it seems wonderful for a large house or a house or apartment with a basement, garage, and/or storage shed … or a situation where a fire could start in one area but you might not be able to easily hear the alarm from a different location in your house, condo, or apartment.I would suggest that the bigger your house, the more you buy. The main reason for this you want to situate each detector in such a way that no two are separated by a distance of more than 50 feet apart. Also you need to consider the line of sight path from one unit to the next closest. Is it a clear shot? Does the signal have to pass through multiple walls? Are the walls drywall, brick, or concrete? Are the walls zig zagged at angles or a nice clear perpendicular path?Something else comes to mind. Make sure you are using good quality batteries, like Duracell, and check the expiry date on them. Also, if you put one in the Kitchen, consider mounting it on the wall away from the stove so you can reach the test button without having to stand on a stepping stool. That test button also acts as a way to mute the system in the event of a non-serious situation like burning a roast in the oven. You can squelch the system for 10 minutes to stop the panic of a full out serious alarm condition while you clear the smoke out.I plan on doing a follow up concerning my personal experience with this system as it pertains to:1] False alarms.2] Battery life.3] How satisfied I am with the system over time.For now, I give it a full 5 stars.I hope you enjoyed my review and I hope it helps you in some way.Update 1:Jan 27,2018. We have had zero false alarms so far, but the system alarmed in different ways two or three timesdue to testing and I did get mixed results. On the first occasion, the smoke detector in the Utility room alarmed.That’s because she was toasting some bread in the small convection oven and it got too hot and burned. I willprobably move that unit into the adjacent hallway ceiling. When I asked the boy if he heard the alarm while he wasin the pool house at that time, he said “no”.The interesting part to this is that when I installed the unit in the pool house, I tested it. It worked. It worked so well,I stepped outside on the porch after triggering the test button and it sounded like an air raid. Six alarms sounding intandem, all throughout the various rooms where they were located. It was almost Orwellian.Sure enough, I performed another test and it resulted in another negative. Pool house will not respond to the other 5, butall the other five will respond to the pool house. The other 5 also respond to each other, it’s just number 6 that doesn’tlisten to the others. As it turns out, I am okay with that. As long as number 6 talks to the other 5, that’s really all I neededanyway. I want to know, in my bedroom hall, if the pool house detector smells smoke. The pool house already has 2 othersmoke detectors (old ones that don’t communicate, they just alarm) that will warn anyone in there. At least I will also getan alarm in my hallway that tells me the “Child’s Room” has detected a warning. That means “Pool House” because that’s how I programmed it. I am still very pleased.